New Notice to Proceed
Process Overview
After the proposal has been selected for funding, a Notice to Proceed (NTP) can be requested. The principal investigator (PI) or project lead collaborates with their Business Offices to request a Notice to Proceed (NTP). The NTP is a formal notification requesting authorization to begin work on the project.
The NTP must include the following details:
- Project title
- Funding agency
- Award amount
- Start and end dates, verified by the sponsor
- Budget details
- Specific conditions or requirements outlined by the sponsor (e.g. Export Control, CUI, Foreign National Restrictions)
- Amount of WBSE’s that are needed
- What responsible cost centers and PI/Co-PI for each
Content
Select a topic to jump to that section or scroll down.
Submission of the NTP request is the authorized approval from the Business Office. Before establishing a grant for the NTP, internal review processes are required by the Post Award Setup Team.
Helpful Resources
Create Notice to Proceed Request
1.
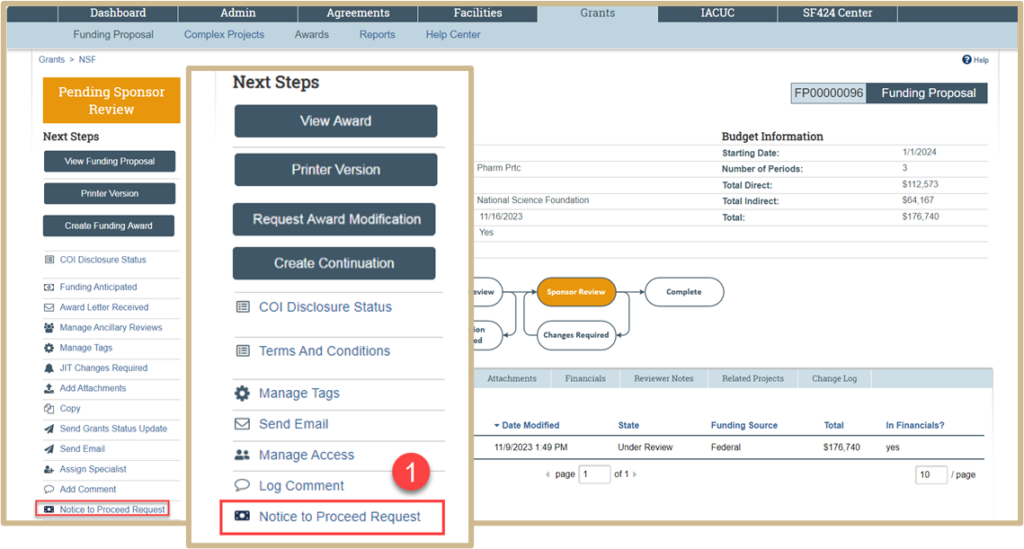
To create a Notice to Proceed Request, click the Notice to Proceed Request activity.
2.
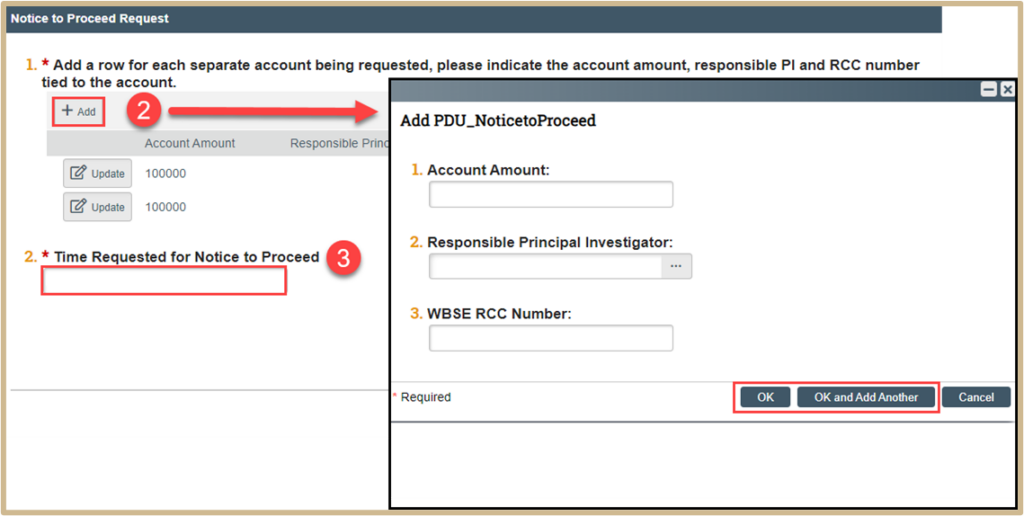
In the new popup window, click +Add to create a row for each requested account, including direct and indirect costs, the account amount, responsible PI, and the RCC number tied to the account.
3.
Add the timeframe requested for this Notice to Proceed (for example, 1/1/2024-12/31/2024. This date should match the sponsor verified award dates for the project. Once finished,
![]() NOTE
NOTE
Once finished, an email will be sent to Setup Team, and they will review and create the award if approved.
Creating an Award – Setup Team Only
The Setup Team will create an Ancillary Review type Budget. The Award will then be sent to the Business Office to complete the NTP budget. Please see Creating an Award Process Guide for more information regarding Ancillary Reviews.
Budget Allocations
Please see Creating an Award Process Guide for more information regarding Budget Allocations.
1.

Click on Budget Allocations on the main screen.

2.
To create a new budget allocation, click +Add and complete the resulting form.
![]() NOTE
NOTE
To edit a default allocation or any other existing allocation, click its name. Authorized Amount displays $0 until Budget Reconciliation is complete.

2.
![]() NOTE
NOTE
Select the financial account to associate with this allocation or funding action. The options available include the current financial account (if any) plus all active accounts defined on the Financial Setup page of this award or modification, or the modification’s parent award.
A financial account is required for all authorized and advanced account allocations and funding actions. If none of the available accounts are acceptable, you can add or edit financial accounts by creating an award modification of type Financial Change.
Send Advance Account Award to Supervisor
Once the budget has been created and the Setup Administrator has completed the award, the assigned Specialist (setup Administrator) will select Submit for Final Review Activity. This action will move the award into Final Review status and move it to the Award Approver for final review and approval. Once the award has been approved and activated it will then integrate with SAP with the Notice to Proceed (NTP) status.
Continuation NTP
Continuation Notice to Proceed Q&A Document
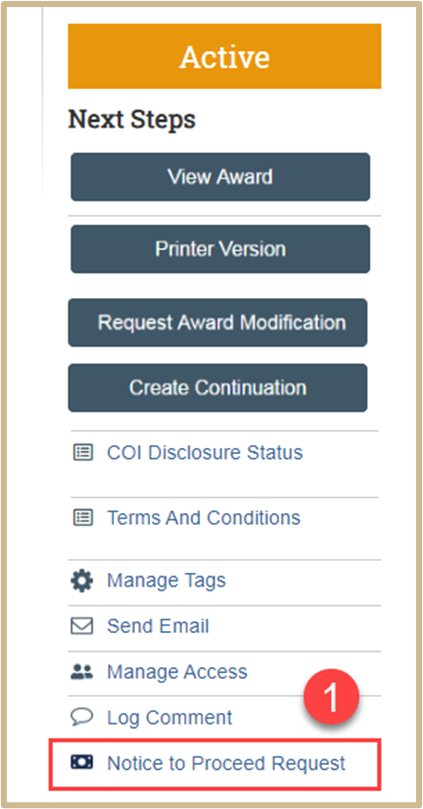
Locate the Award of the project to process the NTP in your Dashboard.
1. Click on Notice to Proceed Request from the main page.
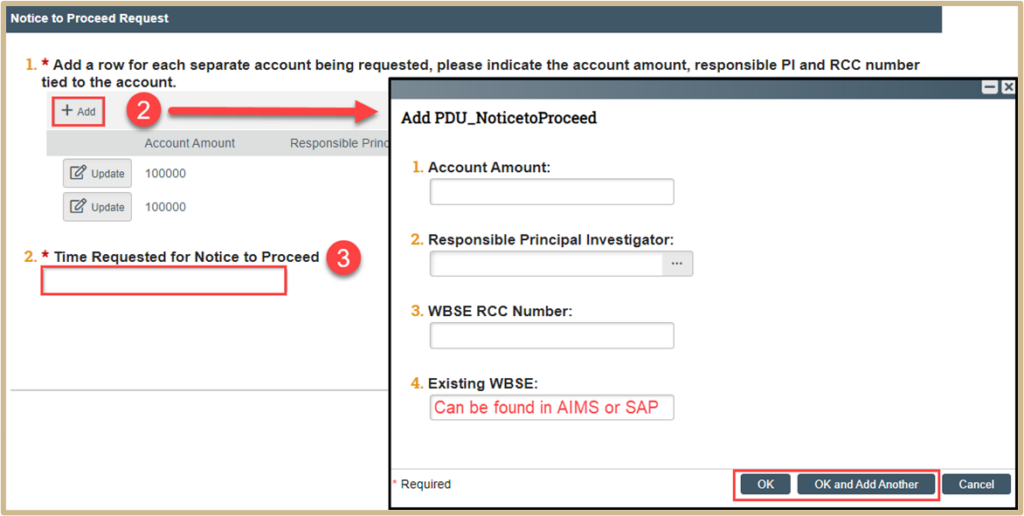
2. In the new popup window click +Add to create a row for each separate account being requested including both direct and indirect costs, the account amount, responsible PI, and the RCC number tied to the account.
3. Add the time requested for notice to proceed including the entire year or first phase if budget is broken down into phases. Once finished, click OK.
![]() Note
Note
Once finished, an email will be sent at this point that will go to your administrative contact who is the Account Management Administrator (AMA) not Setup. They will review to be sure NTP should be set up. Once it goes past the AMA’s review, then an email will be sent from Award to Setup and Setup can then go in and create modifications.
Update Assigned Specialist
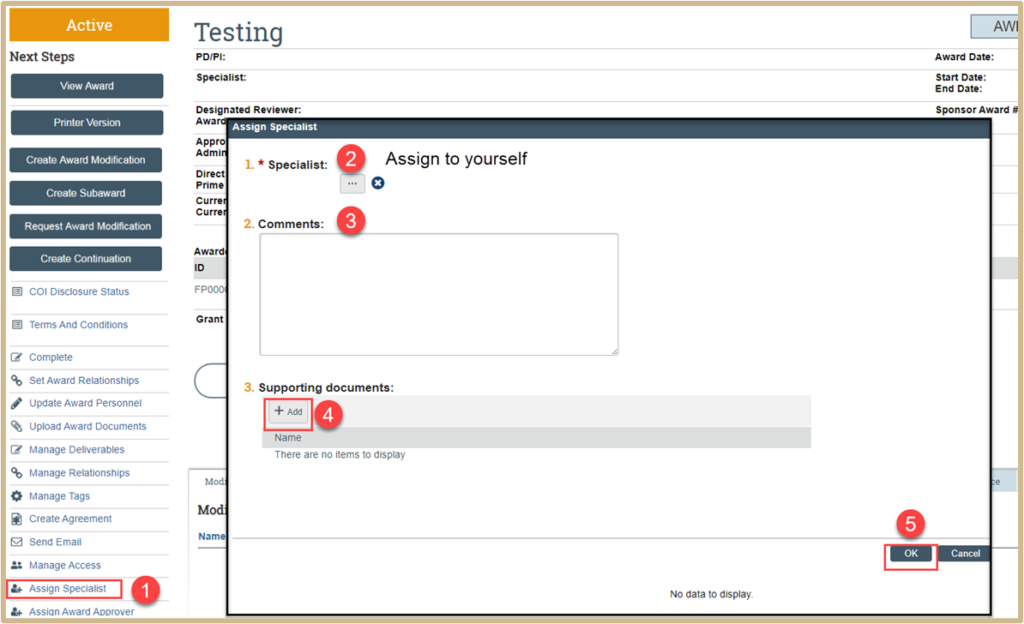
![]() NOTE
NOTE
You must change the Specialist assigned in order to make any changes if needed. The Account Management Administrator (AMA) will be listed. If you do not change the Specialist to yourself, you will not have the ability to make modifications.
1. Click on the Assigned Specialist tab.
2. Assign Specialist to yourself by using the drop-down menu. Find your name and click.

3. Optional: Add any needed comments.
4. Optional: Add any supporting documents.
5. Click OK to finish.
Content Updated: