Intake Process – New Awards
Signature Required
This is a shared process between Contracting and Post Award.
Contracting/ Contracting Clerk would handle the non-funded agreements. Post Award would handle all funding agreements. Post Award will take over this during the launch phase.
Content
Select a step or scroll down to follow the procedure step-by-step
Find Funding Proposal
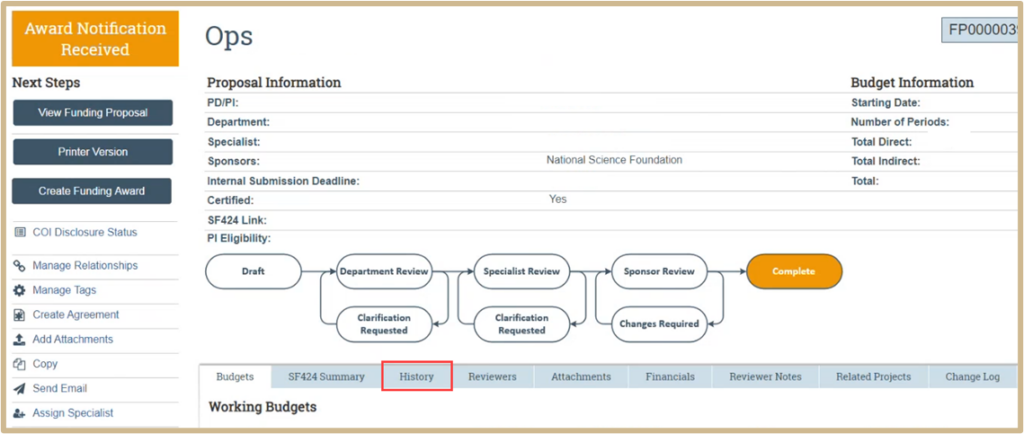
Find the funding proposal in your Dashboard. Launch does Award Letter Received activity and it sends an automatic notification to Account Setup Manager.
![]() NOTE: If there isn’t a funding proposal the Launch Team will request one to be created from Pre-Award.
NOTE: If there isn’t a funding proposal the Launch Team will request one to be created from Pre-Award.
Award Letter Received
Select the images for a larger view.


Setup would go into funding proposal using the link in the Award Letter Received notification. Ensure that all information within this Award Letter Received section maps to the Funding Award. See Creating an Award Guide for more detailed information.
Once finished, click ![]()
Create Agreement

![]() NOTE: The Launch Administrator will need to assign themselves as a Specialist before the Create an Agreement tab will appear.
NOTE: The Launch Administrator will need to assign themselves as a Specialist before the Create an Agreement tab will appear.
Create an Agreement by clicking Create Agreement.

Launch Team should select Sponsored Research Agreement from the Agreement Type drop-down option.
Once finished, click OK ![]() .
.
![]() NOTE: Once the agreement has been created, the Launch Administrator will need to re-assign the original Pre-Award personnel back as the Specialist.
NOTE: Once the agreement has been created, the Launch Administrator will need to re-assign the original Pre-Award personnel back as the Specialist.
Once this step is completed, it will take you back to the main screen. You can check for the added agreement by clicking on the History tab.


Click on Related Projects and find the SRA ID that was just created.
Agreement Upload


Primary contact should be updated to the respective PI.

 If the agreement document has already been drafted, you can attach it to the Agreements SmartForm by clicking the Upload button.
However, if Agreements office staff are going to create the first draft of the agreement, check the First draft to be generated internally? box instead. Agreements office staff will generate or upload a draft by running the Generate Agreement activity.
![]() NOTE
NOTE
If you upload a draft here and Agreements office staff subsequently generate or upload a draft, their document will automatically replace the one you uploaded on this page.

The title will auto-populate over from the funding proposal.
 Type a short name for the agreement. As a guideline, keep it shorter than 50 characters.
This text appears throughout the system as the agreement name, for example, in My Inbox.
This will be automatically generated if left blank and may be changed later.
![]() NOTE: Add CONTR: before the name of the agreement. This alerts Contracting that this is a matter they need to address.
NOTE: Add CONTR: before the name of the agreement. This alerts Contracting that this is a matter they need to address.

The Agreement type will auto-polulate over from the funding proposal. Hoover over each type for more information as needed. In the description add any pertinent information for Contracting such as new award, new award, draft, Docsign in email, etc.e.

Click +Add to include any supporting documents

 Indicate only if:
1. There is a date the Sponsor has specifically required the NDA to be completed by.
2. There is a scheduled meeting with the Sponsor in which Confidential Information is intended to be exchanged.
![]() to the next page, General Information.
to the next page, General Information.
Assign Owner

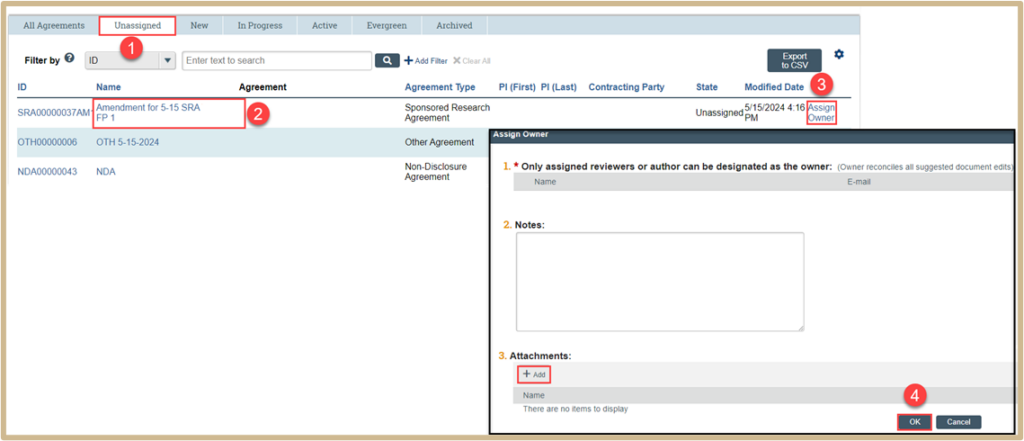
1. Click on the Unassigned activity in the Dashboard.
2. Open the agreement.
3. Assign Owner activity. Whoever is assigned also needs to be assigned as the Primary Contact.
4. Once finished, click OK.
General Information

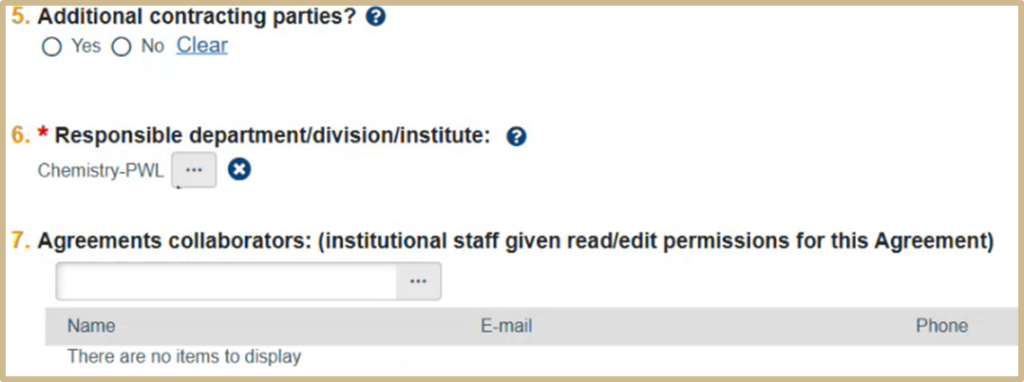
Fill in the Contracting party name. This should always match the award draft.

Fill in the Contracting party point of contact information. This information can typically be found in the award draft or the email chain.


Fill in the Contracting party business address. This should be in the award draft or email chain. If you are unable to locate, please use a search engine as this is a mandatory field to complete.
Once finished, click Exit and then Save Changes & Exit to update information within the Central Office Data tab.
Update Central Office Data Contact Information
![]() NOTE: The contact information within the funding proposal should be updated at this point simultaneously using Central Office Data tab.
NOTE: The contact information within the funding proposal should be updated at this point simultaneously using Central Office Data tab.

Click on the Central Office Data tab after selecting the correct funding proposal from the Dashboard.

Fill in the Agency’s contact information including the address, contact name, and email.
Once finished, click ![]()
Sponsored Research Agreement Information

Return to the Sponsored Research Agreement by selecting Edit Agreement from the Dashboard.

Click on Sponsored Research Agreement Information.

Select the correct Sponsored Research Agreement Type based on the award draft.
![]() to the next page, Completion Instructions.
to the next page, Completion Instructions.
Completion Instructions

Follow the completion instructions. Once finished click Finish to exit the form.

Click on Submit to start the Contracting workflow.
Assign Owner (Contracting Use Only)

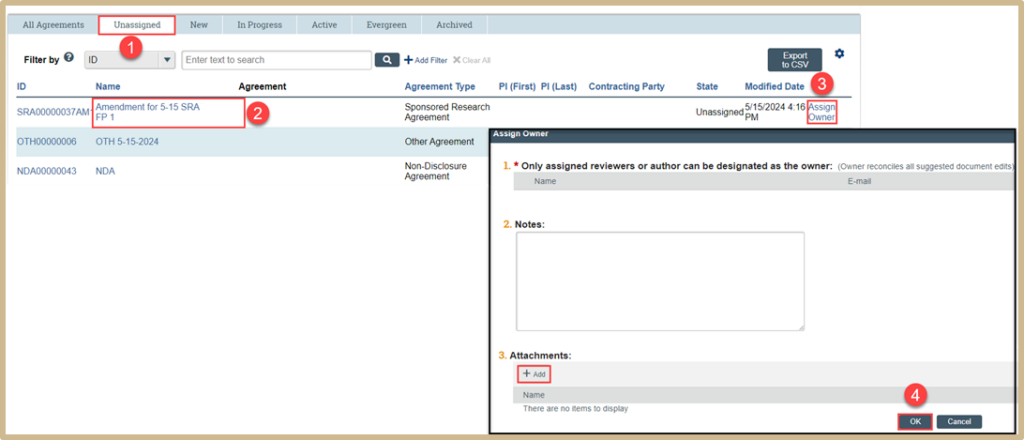
- Click on the Unassigned activity in the Dashboard.
- Open the agreement.
- Assign Owner activity. Whoever is assigned also needs to be assigned as the Primary Contact.
- Once finished, click

Content Updated: