Budget
This section presents topics on creating and managing budgets for funding proposals.
For information about a specific budget type, select the relevant button below.
Content
Select an item below or scroll down to view the information.
An up arrow will appear in the lower right corner of your screen. Selecting this arrow will return you to this menu.
- Create a Budget
- General Budget Information
- Personnel Cost Definition
- Tools for Determining Base Salary
- Personnel Costs (NIH Detailed Budgets, Budgeting Effort, Resources for Calculating Effort)
- General Cost Definition
- Additional Budget Resources (Equipment, Grad Fee Remits, Trainee/Participant Support Costs, Computers and Labs, Travel Estimates)
- General Costs
- F&A Cost Overrides
- Attachments
- Additional Budget Information
Proposal Preparation Checklist
Purdue F&A Instruction, Facilities and Administrative Costs 2.2023
PERA Facility Guidance
PERA NIFA Indirect Costs
Instructions for Indirect Cost Restrictions on Subawards
Pre-Award Salary Types
How to Run a Cognos Budgeting Report Guide
FERAP Process Document for Instructions and Calculator
FERAP FAQs for Pre-Award
PERA FERAP Calculator
PERA AY Salary Conversion Calculator
PERA Person-Month Calculator
PERA Person-Month to Percent Effort Calculator
Hourly Rate Calculator
F&A Guidance on Nodes, Computers and Software
Participant Support vs. Human Subject Incentives
Estimated Travel Cost Calculator
Subcontracting Plan Guidelines
Create Budget Template Instructions
Cost Share Guidebook
Pre-Award Budget Template
Create a Budget
Navigate to the Funding Proposal by Selecting Grants, then Funding Proposal.

Search for the Funding Proposal and select the Proposal Name to open the Workspace.
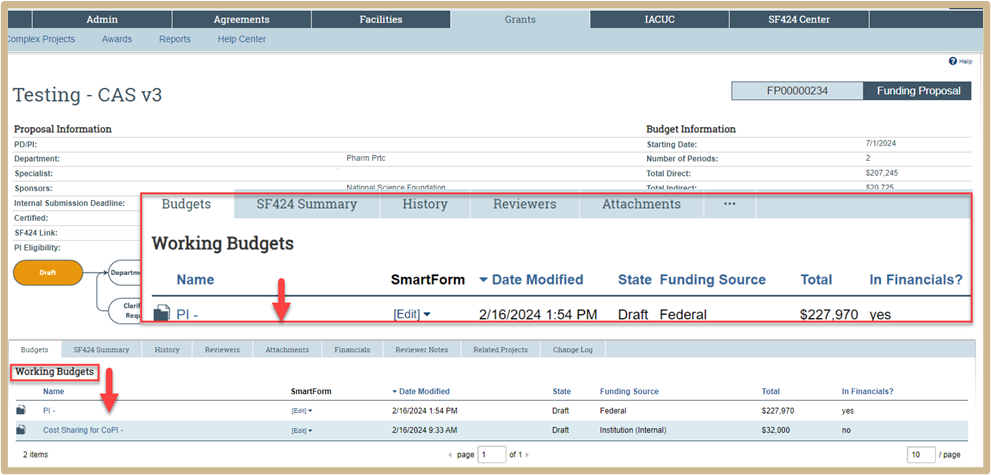
From the Workspace of the Funding Proposal, select the Budgets Tab.
All budgets that have been created will be listed here.
For each new Funding Proposal, a new budget has been created. The title defaults to the name of the sponsor.
Click on the Budget Name.
From this page, sponsor, subaward and cost share budgets can be created.
For sponsor budgets, select Edit Budget to create a budget.
If multiple versions/separate budgets are required, return to the FP Workspace and select Create Additional Budget from the Activity list.
Budgets to be submitted will be selected to include in consolidated budget.
For subaward budgets, select Create Subaward.
Multiple subawards will be entered with this action. After completing the form for a subaward, select the Subawards tab from the Budget Workspace to edit. Only those subawards selected to include in consolidated budgets will be included in the final submission.
For cost share budgets, if personnel costs are to be included as cost share, complete the effort fields on the Personnel Costs page of the sponsor budget. The difference between Effort and Sal Req, or a person paid over the Salary Cap will initiate the creation of a Cost Share budget.
If no personnel costs are to be included as cost share, select Create Cost Share. Complete the pages for General Costs to be included as cost share.
![]() NOTE
NOTE
Each individual cost share budget must be linked to an individual sponsor budget.
Create a Sponsor Budget
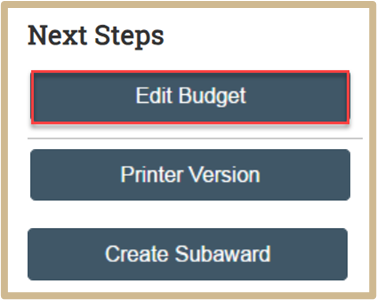
Select Edit Budget to begin editing.
General Budget Information
Information entered on this page will help define the rates used in the sponsor budget. Each budget may have unique information here.
NOTE: Updating a sponsor from TBD to the Correct Sponsor Code may result in a “recalculation” of the SmartForms and budget. The following should be reviewed prior to and after a change is made.
- SmartForm questions may be updated to reflect differences in the sponsor type. Federal and Non-Federal sponsor SmartForms will have different questions. Review the SmartForm to ensure that all questions are answered.
- Attachments may not be deleted. If an attachment is included in a question that is removed from the SmartForm. That attachment cannot be deleted after the form changes. The attachment will be listed on the Attachments tab.
- Budget Titles will update with the name of the sponsor. The titles will need to be edited after the sponsor name update.
- F&A may recalculate. If a non-standard base or rates were used in the budget prior to the sponsor name update, the F&A may default back to standard rates.
1.

![]() Edit the display name of this budget to better identify the owner and/or budget content (similar to Coeus Parent/Child records). Each budget title should be unique. Final budgets need to be updated to include the word FINAL at the beginning of the short title.
Edit the display name of this budget to better identify the owner and/or budget content (similar to Coeus Parent/Child records). Each budget title should be unique. Final budgets need to be updated to include the word FINAL at the beginning of the short title.
2.

3.

![]() If this budget will use the standard PWL F&A cost base and rates displayed in the table below, select Yes. If PFW or PNW rates or other non-standard F&A rates or cost base are needed, select No. An additional table for entering those values will appear. If changes in site configuration impact this budget’s standard rates, the system selects No, and the old rates appear in the non-standard table.
If this budget will use the standard PWL F&A cost base and rates displayed in the table below, select Yes. If PFW or PNW rates or other non-standard F&A rates or cost base are needed, select No. An additional table for entering those values will appear. If changes in site configuration impact this budget’s standard rates, the system selects No, and the old rates appear in the non-standard table.
If Yes

The F&A rates default to the negotiated PWL campus rates. If other rates are to be applied select No above.
If No

Select the correct F&A Cost Base from the drop-down and enter the correct percentage in the text box.
S&W, S&B and S&S do not apply to Purdue.
Additional guidance on Indirect Costs is available here: Purdue F&A Instruction, Facilities and Administrative Costs
Pre-Award only – documentation of on/off campus facilities can be found here: PERA Facility Guidance
Indirect Costs
Some sponsors have increased requirements in the Indirect Costs calculations. They may not allow Indirect costs over a set percentage of a project, and/or not allow indirect costs on specific personnel or general cost item.
If this applies to this project, additional sponsor budgets may need to be created with differing F&A rates to accomplish the requirements.
Instructions for PERA NIFA Indirect Costs and Instructions for Indirect Cost Restrictions on Subawards can be found here.
Indirect Cost Waivers
If the indirect cost rate differs from Purdue’s federally negotiated rate and the lower rate is not documented in sponsor guidelines, an Indirect Costs Waiver may be required.
To request a waiver, an email should be sent to the Director of Pre-Award followed by an Indirect Cost Waiver Ancillary Review.
Exception: Corporations/Foundations/Not-for-Profits with Direct Costs <=$10k
See Ancillary Review Instructions for more information.
4.

![]() Select Yes to include this budget in the total proposal budget displayed in the financials tab of the proposal workspace. The financials tab should reflect the total sponsor budget submitted in the proposal.
Select Yes to include this budget in the total proposal budget displayed in the financials tab of the proposal workspace. The financials tab should reflect the total sponsor budget submitted in the proposal.
Select No to exclude this budget from the total proposal budget.
If this is a cost share budget, always select No.
5.

![]() If salary cap applies to the selected sponsor, the current salary cap amount will default here.
If salary cap applies to the selected sponsor, the current salary cap amount will default here.
The salary cap will only populate when an NIH sponsor is listed as the Direct Sponsor. For NIH flow-through, the salary cap rate will be manually entered.
To override the default salary cap, type in a new amount.
If Salary Cap applies, a cost share budget will be automatically created and may be edited from the Project Budget workspace Activity menu.
6.

![]() The inflation rate for personnel will default to the current approved rate for the University. The inflation rate is the same for all personnel categories.
The inflation rate for personnel will default to the current approved rate for the University. The inflation rate is the same for all personnel categories.
Always check the Inflate Period 1 box to inflate Personnel Cost in Period 1.
The inflation rate for General Costs will default to 0% and should not be changed unless special circumstances apply.
Select Continue to proceed to Personnel Cost Definition.
Personnel Cost Definition
This page is for specifying institutional personnel to be included in this budget. When this page is saved, Grants creates rows on the following Personnel Costs page for each person listed here.
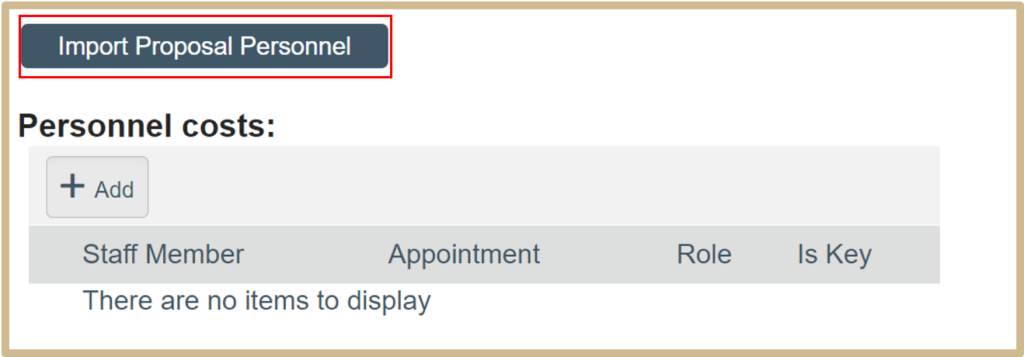
The Import Proposal Personnel button imports the PI and all other institutional personnel added to the proposal’s Personnel page as “Senior/Key person on the proposal” or as “Other personnel.” Personnel added as “Other significant contributor on the proposal” are not imported. Import personnel is only available once per budget; this button will not appear again after the initial import has been completed.
To add these personnel individually, click the +Add button under Personnel costs, and complete the resulting form.
If budgeting summer months for any personnel with an AY appointment, a new row must be added with the default base salary information changed to a summer base salary. Create a placeholder salary row for a position yet to be staffed by selecting Staff Member To Be Determined.
All named personnel must appear on the Personnel page of the SmartForm. To view, add, or delete personnel from the proposal before importing, click Go to additional personnel on funding proposal.
To view, add, or delete personnel from the proposal before importing, click Go to additional personnel on funding proposal.
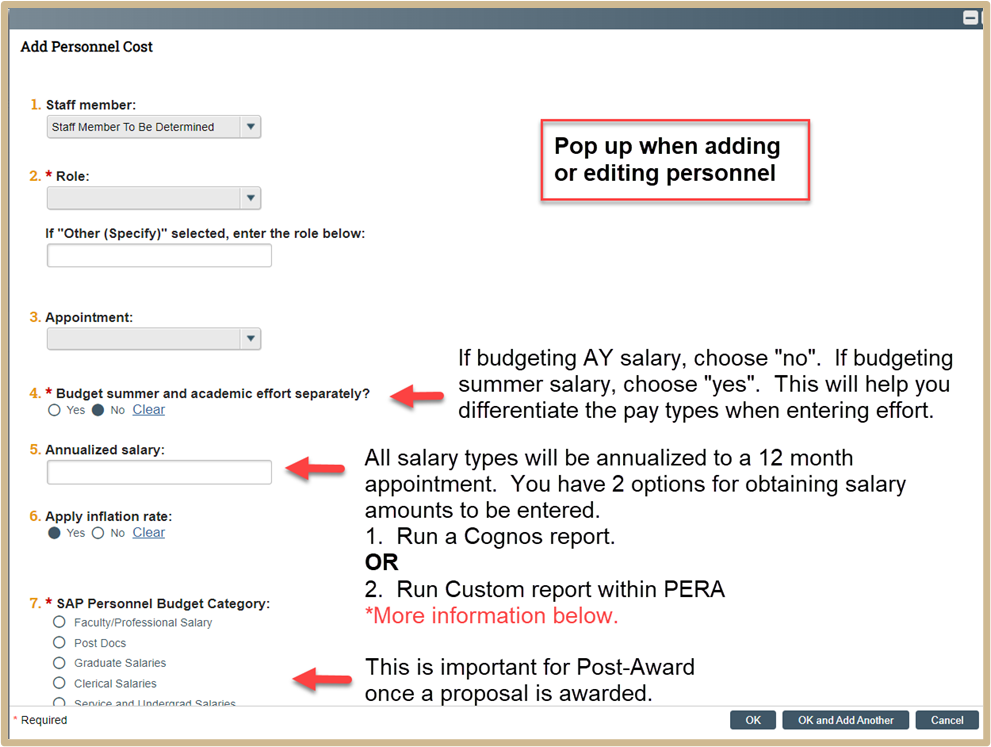
Staff member: If budgeting a named person, choose the name from the drop down. When budgeting AY and Summer effort, or any FERAP effort, add this person as separate row for each base salary.
If a name does not appear in the drop down, return to the Smartform Personnel page and add the name under Project Personnel 3a. After saving, return to this budget page.
To add an unnamed person, select Staff Member to Be Determined.
Role: Select the correct role for this staff member. For system-to-system applications, the role chosen here will populate the SF424 forms.
Appointment: Select the correct option for this personnel type to assist with identifying 12 month (FY), 9 month (AY) or (3 month Summer) personnel entries.
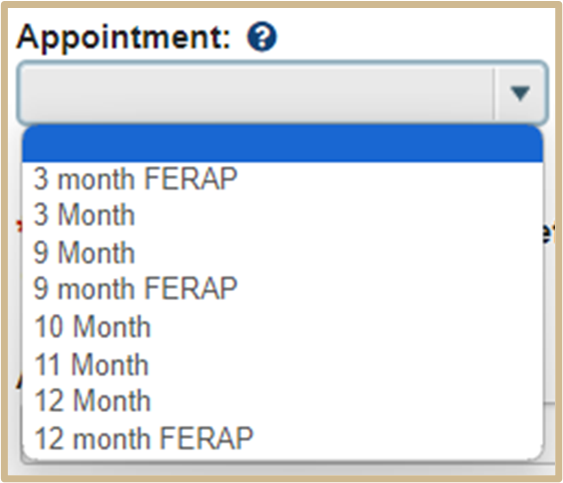
This selection has no impact on the budget calculation.
Budget summer and academic effort separately?
The selection here will depend on the type of appointment this entry represents.

- If adding an AY salary personnel line (9 Month or 9 month FERAP), choose “No”. The system will only provide Effort Mos and Sal Req Mos. for the AY effort on the Personnel Costs page.
- If adding a Summer salary personnel line (3 Month or 3 month FERAP), choose “Yes”. The system will provide SM Effort mos. SM Sal Req Mos. AY Effort Mos. And AY Sal Req Mos.for the Summer Effort on the Personnel Costs page. Only the Summer effort lines would be used.
- If adding an FY salary personnel line (12 Month or 12 month FERAP), choose “No”. The system will provide Effort Mos and Sal Req Mos. for the FY effort on the Personnel Costs page.
Annualized Salary: All salary types will be reflected as a 12 month annualized rate. A named person will default a 12 month base salary from the financial system. Summer, FERAP and FERAP Summer rates will be entered on a separate row by overriding the default rate. Annualized salary for a To Be Determined positions will default a blank field.

For assistance with updating rates for Summer and FERAP, contact the Pre-award Specialist.
![]() NOTE
NOTE
For NIH Detailed Budgets, use the current base salary for this individual. Rates will be manually adjusted on the Personnel Costs page.
Apply Inflation rate: Selecting Yes will inflate the Annualized salary in each budget period for all personnel, these rates will not be editable. Selecting No will inflate the Annualized salary in each budget period for all personnel; these rates will be editable on the Personnel Costs page.

Select Yes for all budgets. The annualized salary in each budget will not be editable.
Select No for all NIH detailed budgets. The annualized salary in each budget period will be editable.
![]() NOTE
NOTE
NIH Detailed Budgets should not have inflation applied to the Salary line items. Follow the instructions below for NIH Detailed Budgets.
SAP Personnel Budget Category: Select the correct personnel category for this person. Choosing the correct category here will ensure the budget allocations are correct in the award budget allocation.

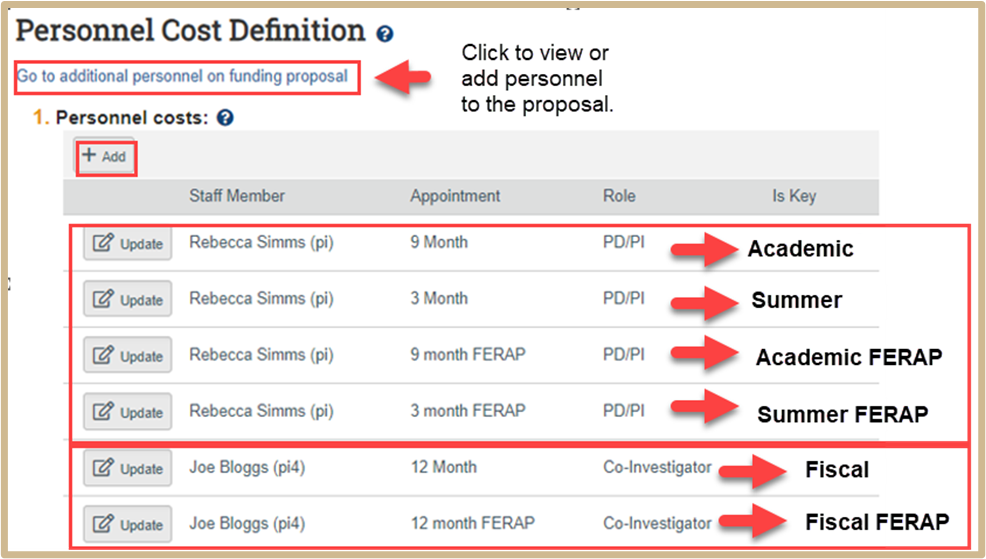
Example of Multiple Entries to reflect Various Base Salary Amounts
Add personnel multiple times in order to capture the AY vs Summer vs FERAP salaries. These cannot be budgeted on the same line.
![]() NOTE
NOTE
A 12-month salary is brought into the budget for all appointment types. Selecting 3 months, 9 months or 12 months, etc. does not impact calculation.
The only reason to designate a different number of months is to differentiate between:
– Fiscal year
– Fiscal year FERAP
– Academic year
– Academic year FERAP
– Summer
– Summer FERAP
Tools for Determining Base Salary
Two options have been created to assist with AY/Summer and FERAP base salary lookup.
For both options, Salary Calculations are based on information from Success Factors. Base salary, Admin Adjustments, FTE and additional appointments are all considered. There may be situations where the calculated salary is incorrect. Contact a manager if you find salary amounts that are off.
1. Cognos Report – Report view of Employee file with Policy Handbooks
This report includes appointment information (including Courtesy appointments, FERAP applicability, converted AY Base, converted Summer Base and Converted AY and Summer FERAP Base salaries. The report also includes Policy Handbook information for AY/FY Policy, Grad and Post Doc Types and Rates Based on the Individual’s department.
![]() NOTE
NOTE
Policy Handbook Information for the Cognos report is provided through “master file” that is manually updated and sent to the SPS Data Team. Updates to Policy Handbooks should continue to be made in each College specific handbook. Do Not send update requests to perahelp@purdue.edu – send to the Manager for that college.
Refer to How to Run a Cognos Budgeting Report Guide to use the Cognos Report.
![]() NOTE
NOTE
If searching for FERAP salary, use the Cognos report.
2. PERA Custom Report – Person Profile
This report includes appointment information (including Courtesy), converted AY Base, converted Summer Base location and phone number, employment type, FERAP appointment Y/N, Grants Eligibility information and Pre-Award Specialist assignment.
Run a Custom Report in PERA

Under Grants, click on Reports.
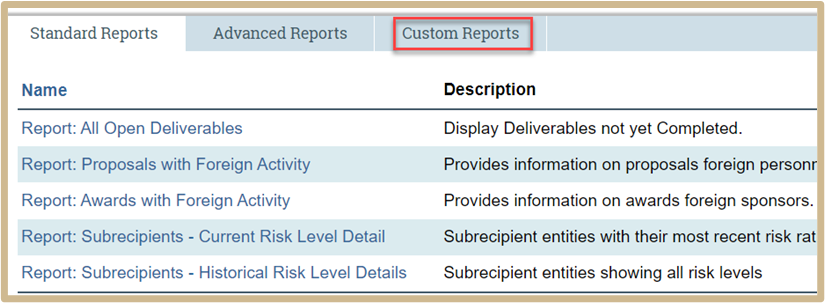
Click Custom Reports.
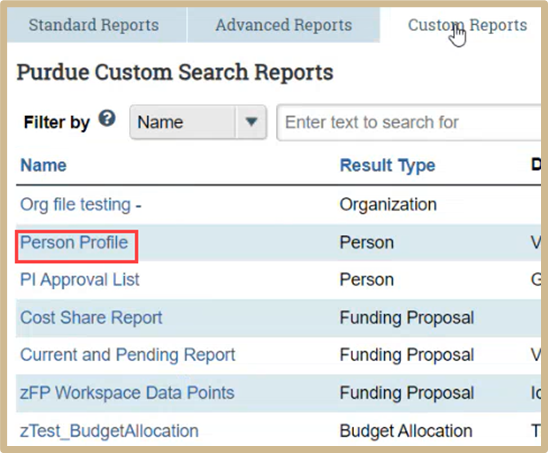
Click Person Profile.

Search for the staff member’s last name.
To add first name to the search, select add filter and change the search to First Name. This will narrow the results.
Current Base Salary and Summer Salary will be shown in the results.
Scroll to the right to find their base salary and summer salary.
![]() NOTE
NOTE
If FERAP Flag is marked “Yes”, use the Cognos report (directions are above).

Enter salary information into Annualized Salary.
![]() NOTE
NOTE
For FERAP appointments: If a PI indicates they have applied in the latest approval cycle (historically in May), the FERAP information may not be in the financial systems until the start of the Fall semester.
FERAP Resources
- FERAP Process Document and Instructions for Calculator
- FERAP FAQs for Pre-Award
- PERA FERAP Calculator
![]() NOTE
NOTE
Only Personnel that are in Success Factors will be searchable in the Person Profile and Cognos reports. For Personnel with no salary information in Success Factors, or if a new base rate is expected due to promotion or job change, refer to the AY Salary Conversion Calculator.
PERA AY Salary Conversion Calculator
Select Continue to proceed to Personnel Costs.
Personnel Costs
The system annualizes all salary types. This guide describes how effort will be entered into PERA. The option to enter as Months versus Percentage is selected by the answer to Question 6 (Q6) in the Funding Proposal – Budget Periods and Key Dates tab.
- Remember: the salary amounts that default and those reflected in the PERA Custom Report or the Cognos Report have been converted to a FY Base. No calculation is needed.
![]() NOTE
NOTE
If Salary Cap applies to any personnel line items the Annualized salary for each applicable budget period will reflect the salary cap amount, effort does not need to be updated. A cost share budget will be automatically created. Upon exiting the sponsor budget, a selection will be available in the activity list to Create Cost Share.
Apply Inflation Rate: YES
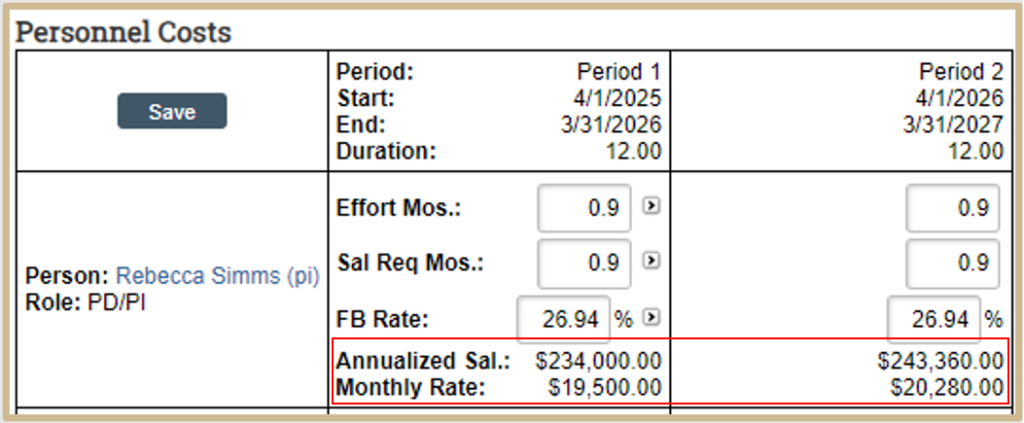
The Annualized salary amount in each period reflects the Inflated Annualized Salary and Monthly Rate.
Apply Inflation Rate: NO
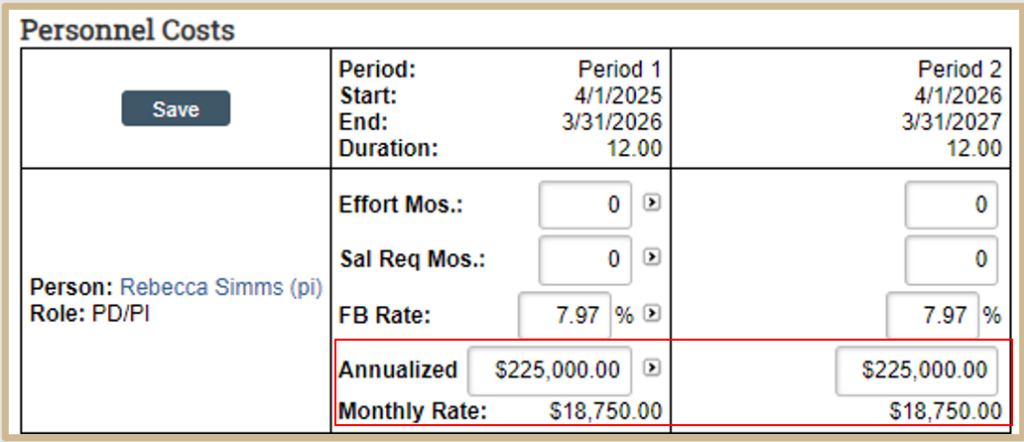
The Annualized salary amount in each period reflects a Non-Inflated Annualized Salary and Monthly Rate. Entries are editable.
![]() NOTE
NOTE
Verify that the Annualized Salary amount in Period 1 has been inflated as expected. If needed, manually calculate the period 1 inflated rate.
Example: $225,000 x 1.04 = $234,000
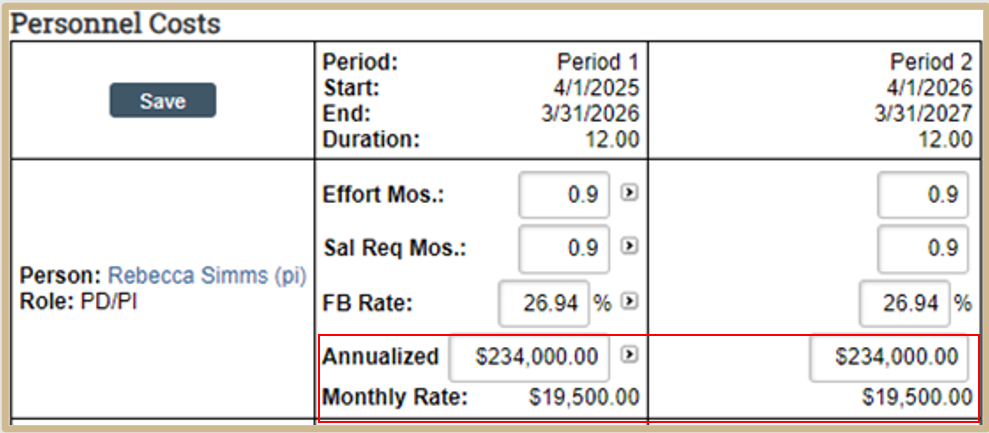
Enter the new rate in Period 1. Use the push arrows to the right of the salary field to replicate the rate in each period.
Duplicate this action for all personnel.
Budgeting Effort
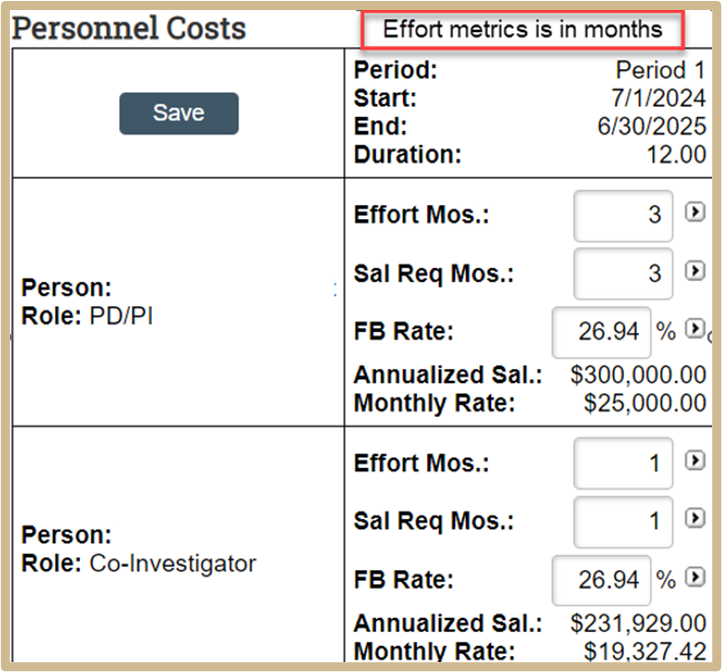
![]() NOTE
NOTE
If the effort metric for this proposal is in months, the system prompts you to select whether to budget the effort for each person by calendar year or to distribute it between summer and academic sub-periods.
Click Edit to enter the effort for each personnel line.
Click the push arrows at the right of a budget period column to replicate values in successive periods.
Person Months or Percent of Effort will be entered depending on the selection from the SmartForm Budget and Key Dates page #6. To switch from the current type of effort entry, return to the SmartForm and change the selection.
For Person Months Entry:
- Effort Mos. Enter the number of months working on the project.
- Sal Req Mos. Enter the number of months requested to be paid on the project.
- A difference in the Effort and Request indicates cost share. A cost share budget will be automatically created. Upon exiting the sponsor budget, a selection will be available in the activity list to Create Cost Share.
For Percentage Entry:
- Effort: Enter the percentage of time working on the project.
- Sal Req: Enter the percentage of time requested to be paid on the project.
- A difference in the Effort and Request indicates cost share. A cost share budget will be automatically created. Upon exiting the sponsor budget, a selection will be available in the activity list to Create Cost Share.
![]() NOTE
NOTE
All percentages need to be converted to a 12 month percentage. Ex. 10% of a 9 month appointment = 7.5% (9 x .10 = 0.90 months/12 = 7.5%)
Resources for Calculating Effort
To calculate person months, based on a number of days requested, use 21.667 days per month. This applies to all appointment types: FY, AY and Summer.
Example: Request for 5 days of summer. 5 Days / 21.667 = 0.23 Person Months
Person Month and Hourly Rate Calculators can be found below.
FB Rate will default to the approved rate for each named individual. All TBD personnel will default to the Graduate Student Rate.
This rate must be edited to the correct rate for non-grad positions. Pre-Award should ensure that rates have not been changed prior to finalizing a budget.
When satisfied with your entries, click the Save button to update the figures in the Totals view of the budget tables.
![]() NOTE
NOTE
The salary cap will only populate when an NIH sponsor is listed as the Direct Sponsor. For NIH flow-through, the salary cap rate will be manually entered.
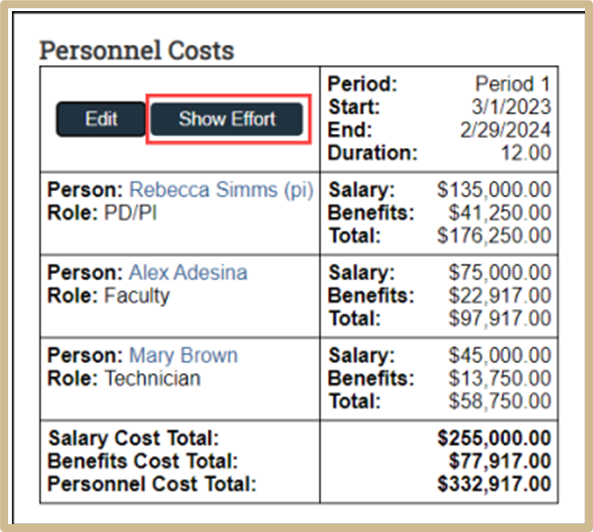
To view all rates and totals (with effort and salary requested represented as both months and percentages), click Show Effort.
![]() NOTE
NOTE
Budget viewers as well as editors can do this.
Personnel costs notes
![]() NOTE
NOTE
Input any helpful notes about personnel here.
Example 1:
PI requests 10% AY and 1 summer month.
Best practice is to enter effort as person months. Convert Percentage to Person months: 10% AY x 9 months = 0.9 Person months.
Enter into PERA as follows:
- Line 1: AY salary line effort 0.9 month
- Line 2: Summer salary line effort 1.0 month
Example 2:
PI request 20% AY and 20% Summer.
Best practice is to enter effort as person months. Convert Percentage to Person months: Line 1: 20% AY x 9 months = 1.8 person months. Line 2: 20% Summer x 3 = 0.6 person months.
Enter into PERA as follows:
- Line 1: AY salary line will be 1.8 person months
- Line 2: Summer salary line will be 0.6 person months
Example 3:
PI is a 12 month employee and requests 10% FY.
TWO Choices for entering in PERA: by Months or by percentage
- By Months: FY salary line will be entered as 1.2 person months
(12 months x 10% = 1.2 person months)
OR
By Percentage: FY salary line will be entered as 10% effort.
![]() NOTE
NOTE
If changing from entering effort as Months to Percentage, all employees will need to be budgeted as Percentage. If personnel have already been entered with Months, the system will automatically recalculate the person months to the correct Percentage. The same logic applies if switching already budgeted personnel from Percentage to Months.
Example 4:
PI requests 10% AY and 1 summer month.
You decide to enter it as Percentage rather than Person Months.
Convert % AY to % FY:
1. Calculate AY person months: 9 months x 10% = 0.9 person months
2. Convert AY person months to FY Percentage: 0.9 person months divided by 12 = 7.5% FY
3. Convert 1 summer month to Percentage: 1 summer month divided by 12 = 8.33% FY.
Enter into PERA as follows:
- Line 1: AY salary line will be 7.5%.
- Line 2: Summer salary line will be 8.33%.
Select Continue to proceed to General Cost Definition.
General Cost Definition
This page is for specifying all non-personnel costs to be included in this budget. When this page is saved, Grants creates rows on the following General Costs page for each line listed here. If budgeting multiple lines for a General Cost item, each new row must be added here. To add general costs, click the Add button under General costs, and complete the resulting form.
![]() NOTE
NOTE
Cost Share and Subaward Costs will be entered by selecting Create Cost Share or Create Subaward from the Budget workspace.
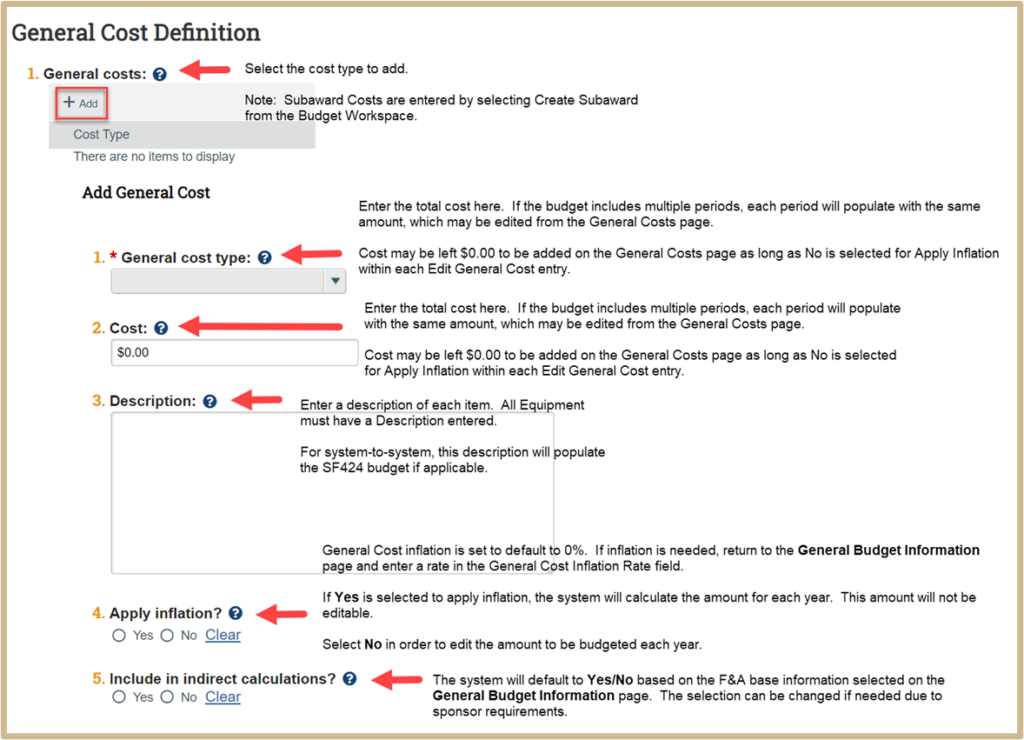
Apply Inflation?
- Select Yes to apply inflation to each year. This amount will not be editable.
- Select No in order to edit the amount budgeted each year.
Include in indirect calculations?
The system will default to Yes/No based on the F&A base chosen on the General Budget Information page. The selection can be changed if needed due to sponsor requirements.
![]() NOTE
NOTE
The system will only apply inflation if a rate is added to the Enter Inflation Rates question on the General Budget Information page. Enter Inflation Rates on the General Budget Information Tab. If you only click “Yes” on this page and General Budget Information page does not have an inflation rate, no inflation will be applied.
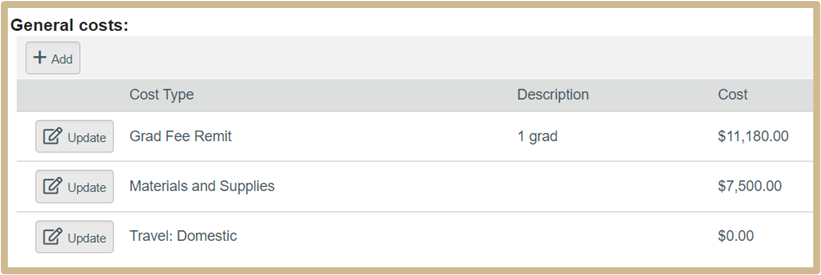
Check the General Costs items list to ensure that all items have been entered. There is a row for each item. Multiple rows may be added for each type. To delete a row, click the X to the right of the row.
Select Continue to proceed to General Costs.
Additional Budget Resources
Equipment
Equipment is defined as tangible personal property having a useful life of more than one year and a per-unit acquisition cost which equals or exceeds $5,000. Fabricated, General Purpose and Scientific & Instruction Equipment will be budgeted under the Equipment general cost item. A description of each Equipment item will be required.
![]() NOTE
NOTE
Equipment and the Description will propagate to the SF424.
Nodes, Computers and Software
Many of the technology resources on campus have established Recharge Centers or approved Internal or External rates. How these rates were negotiated will determine if indirect costs should be charged. Software and Computer costs should also be considered differently than other Equipment Costs. Additional information is available in the F&A Guidance on Nodes, Computers and Software.
Grad Fee Remits
When Budgeting Grad Fee Remits refer to the Fee Remits Table for the current Fiscal Year. Each campus has established rates charged each pay period. PERA will not inflate the rates for future years, the increases require manual updates on each line.
![]() NOTE
NOTE
Grad Fee Remits will propagate to the SF424 to the “Other” category.
Trainee/Participant Support Costs
Trainee/Participant Support are direct costs for items such as stipends or subsistence allowance, travel allowances and registration fee paid to or on behalf of participants or trainees (but not employees) in connection with conferences or training projects. A trainee does not perform work or service for the project or program. Additional information is available in Participant Support vs. Human Subject Incentives.
Travel Estimates
There are many cost items to consider when estimating domestic and foreign travel. Each sponsor will have varying levels of detail required. The Estimated Travel Cost Calculator can be used assist with estimating travel.
The following government sites are also available for determining per diem rates.
Domestic: https://www.gsa.gov/travel/plan-book/per-diem-rates
Foreign: https://allowances.state.gov/web920/per_diem.asp
General Costs
All General Costs must be added on the General Cost Definition page. Editing the cost is allowed for those costs which have No selected for Apply inflation.
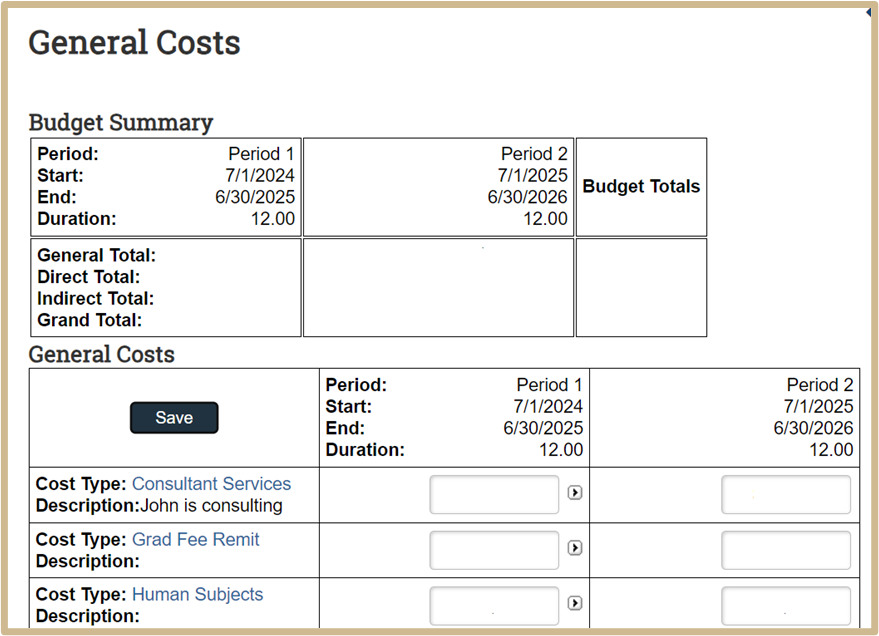
![]() Displays each cost type entered on the previous Page. Edits can only be made to the cost for Years 2 through the end of project if the “apply inflation” on previous page is checked “no” for each cost type added.
Displays each cost type entered on the previous Page. Edits can only be made to the cost for Years 2 through the end of project if the “apply inflation” on previous page is checked “no” for each cost type added.
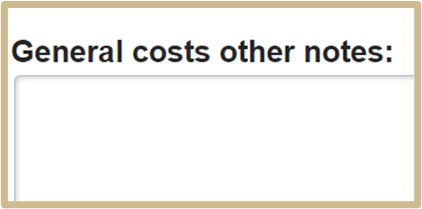
General costs other notes
![]() NOTE
NOTE
Add relevant notes related overall general costs here. Include information which may be helpful for budget allocation at award time.
Select Continue to proceed to F&A Cost Overrides.
F&A Cost Overrides
1.
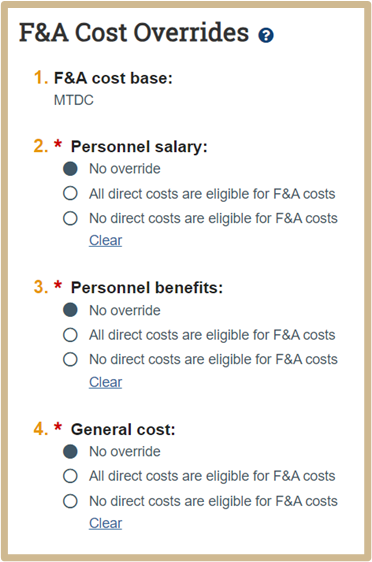
![]() For each cost category, you can make all or none of the direct costs eligible for F&A costs. To keep the default F&A cost base rules in force, select “No Override”.
For each cost category, you can make all or none of the direct costs eligible for F&A costs. To keep the default F&A cost base rules in force, select “No Override”.
Select Continue to proceed to Attachments.
Attachments

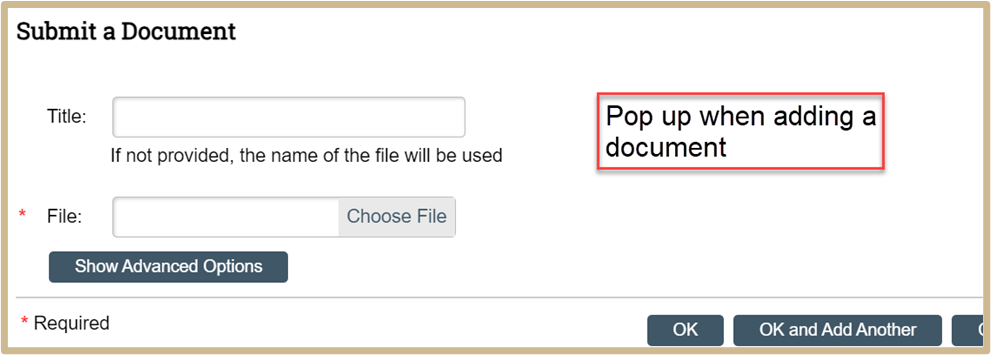
![]() Upload any relevant budget documents. Documents loaded within the budget module are not visible on the Attachments tab of the Funding Proposal Workspace.
Upload any relevant budget documents. Documents loaded within the budget module are not visible on the Attachments tab of the Funding Proposal Workspace.
Pre-Award will ensure that all final documents are uploaded prior to proposal submission.
![]() NOTE
NOTE
Attachments added here will NOT propagate to the SF424.
When satisfied with all your budget entries and attachments, click Finish.
The Financials tab on the budget workspace now shows period and cumulative totals for the budget you have completed.
RESOURCE: Budget Workspace Activities
Each Budget Workspace includes a list of Actions and Activities that can be completed for that specific budget version. Most Actions and Activities are based on User Role and the type of budget (sponsor, cost share, subaward).
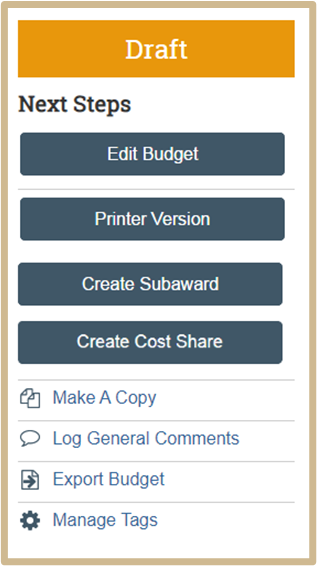
View or Edit Budget: allows viewing or editing of the budget
Printer Version: provides a print view of the forms and budget
Create Subaward: creates a subaward budget, can be used for one or more subawards
Create Cost Share: creates a cost share budget, only allowed once per sponsor budget
Make a Copy: provides a copy of the current budget that can be edited to create different versions of the budget
Log general Comments: Comments can be added to a specific budget. Only viewable from the History tab of the budget where the comment was made
Export Budget: Downloads an excel version of the budget from which the action was taken. This file can then be used to create the Budget Template.
Manage Tags: Not in Use at this time. Subaward and Cost Share Budgets have a Withdraw option in the Activity List.
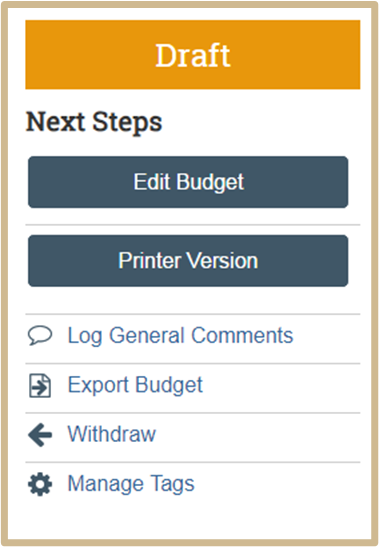
Withdraw: Removes the associated budget from the Sponsor budget. If removed the subaward or cost share budget cannot be restored.
Subcontracting Plans
A Subcontracting Plan is required when a federal agency anticipates awarding a contract that is expected to exceed $750,000 over the life of a project. The subcontracting plan establishes an estimated amount of goods and services to be purchased for a project from small, small disadvantaged and women-owned vendors. Review sponsor guidelines for applicability.
PERA Subcontracting Plan Guidelines
![]() NOTE
NOTE
Subcontracting Plans will be handled outside of the system via email. Add any finalized documentation to the Funding Proposal.
NIH Modular Budgets
NIH uses a modular budget format to request up to a total of $250,000 of direct costs per year (in modules of $25,000, excluding consortium F&A costs) for some applications, rather than requiring a full detailed budget. PERA is able to assist with creating a NIH Modular Budget.
To create an NIH Modular Budget
Navigate to the Budget Periods and Key Dates page of the Funding Proposal Smartform.
1.
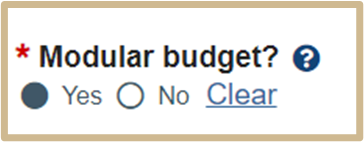
![]() Select Yes if submitting an NIH Modular budget.
Select Yes if submitting an NIH Modular budget.
Compete the remainder of the Smartform. Select a Sponsor Budget to create the Modular budget.
Follow the Create a Budget instructions to create or edit the budget. After all costs are included, return to the Budget workspace and View the Financials tab.
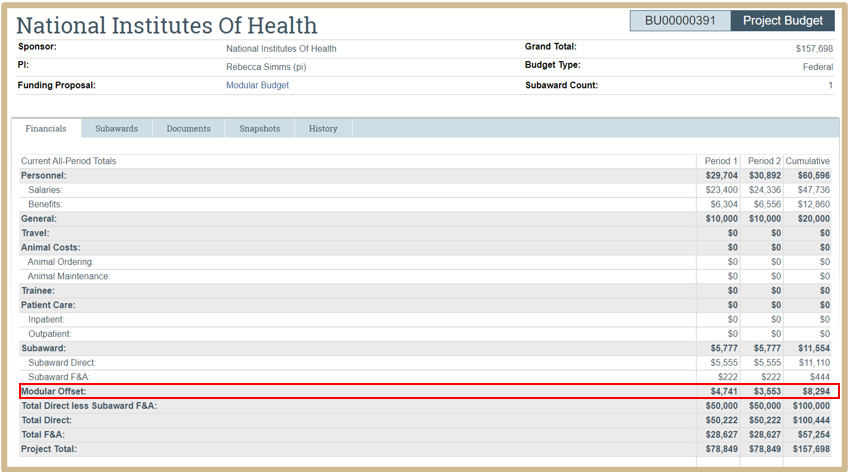
The Modular Offset line reflects the amount to be added to reach the next Direct Cost Module.
Determine if costs should be added or removed to reach the desired Module amount.
Return to the budget form to edit the costs.
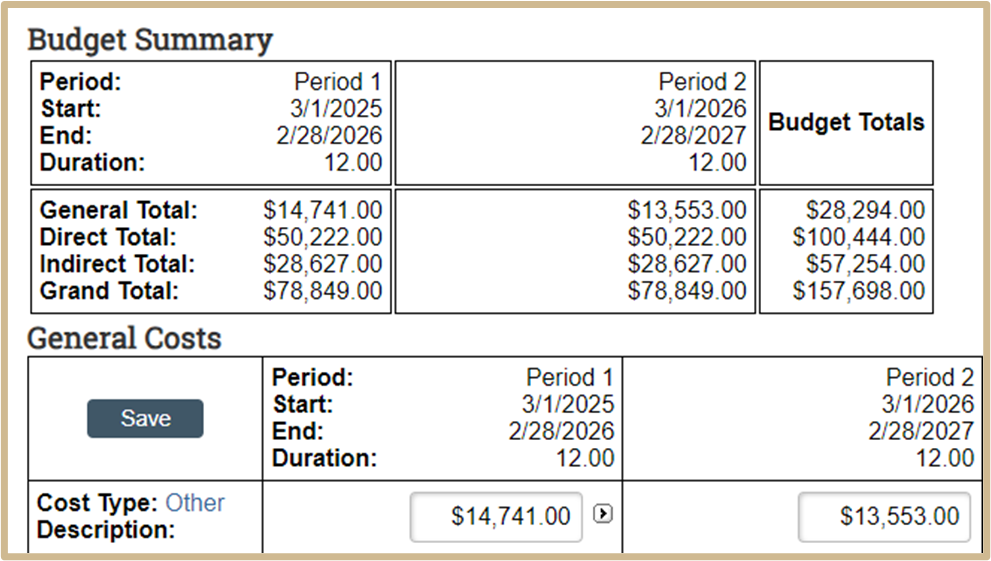
In this example, the Year 1 budget had Other Costs budgeted for $10,000 with an Offset amount of $4,741. The year 2 budget had Other Costs budgeted for $10,000 with an offset amount of $3,553. The offset amount has been added to the previously budgeted $10,000 to balance to the desired Direct Cost Module.
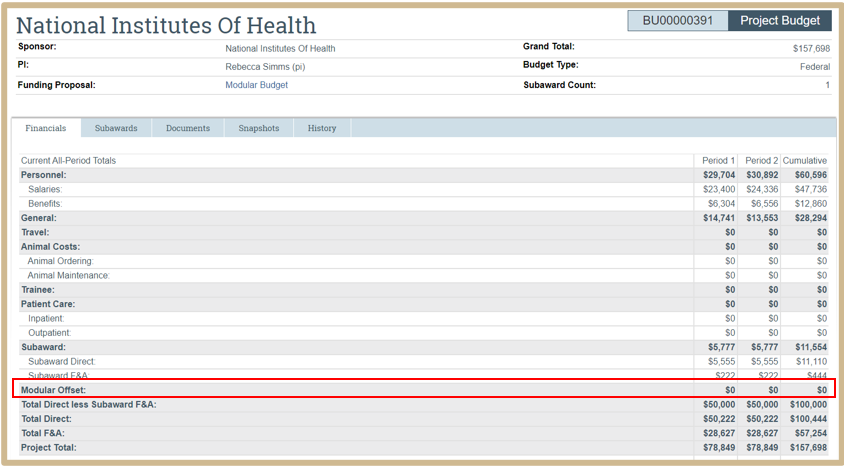
The Modular Budget is complete when the Modular Offset line item is $0.
![]() NOTE
NOTE
The system will always increase a Modular budget to the next $25,000 increment and use the same modular amount each year.
Budget Review
Budgets may be edited and viewed based on a Person’s role on the Funding Proposal. View an individual project budget from the Financials tab of the Budget Workspace for a consolidated view of costs.
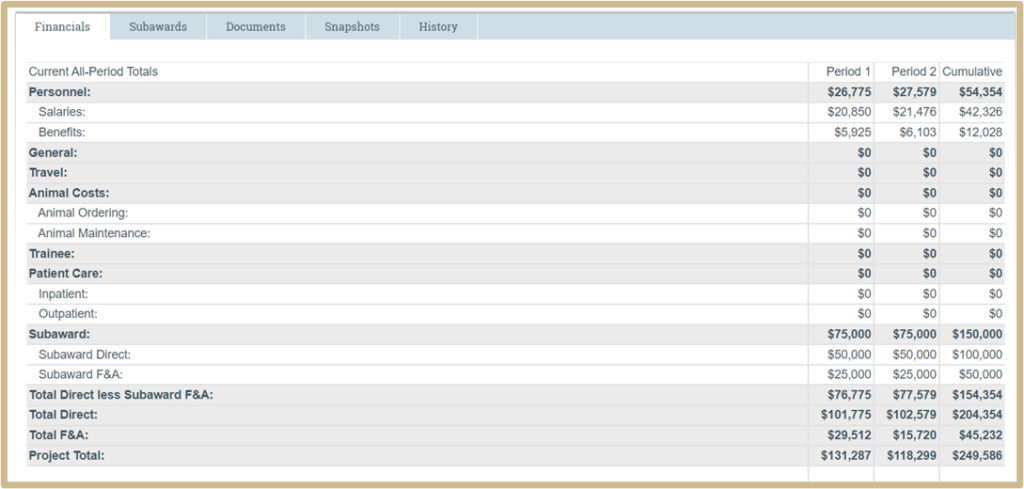
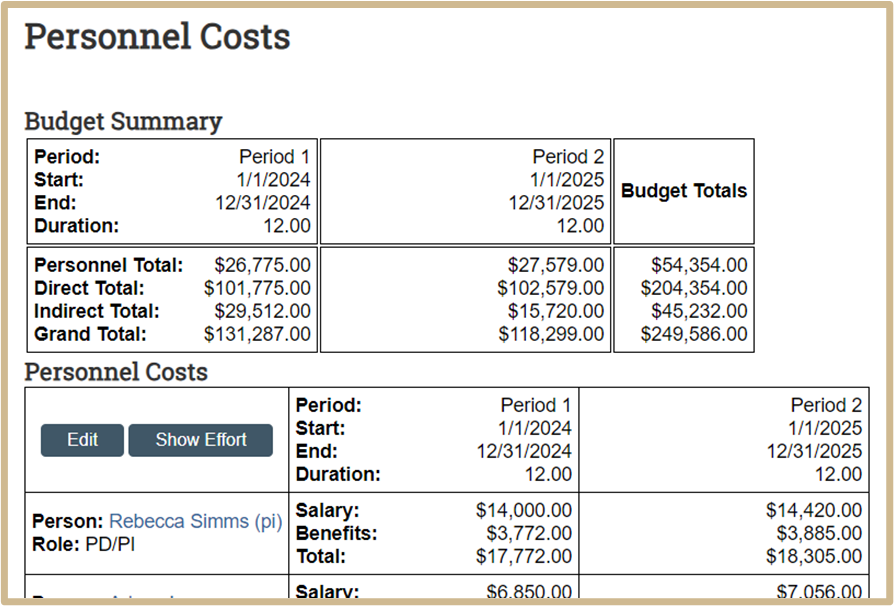
A more detailed view of the budget within PERA will be shown on the Personnel Costs and General Costs pages.
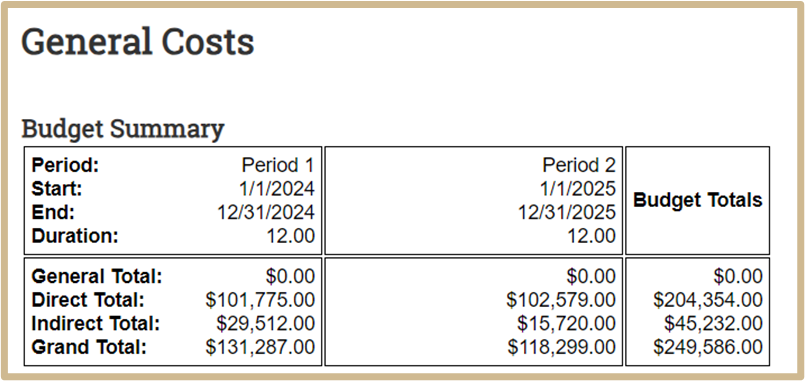
For a detailed view of the budget, a Budget Template has been created for Pre-Award to prepare and share. This Template can be used for multiple budgets in the same file.
Export the Budget and Create Budget Template
After a draft budget is created, the Pre-Award Specialist will export the budget information to excel and send it to the PI via email for review and adjustments. This excel file can be edited as needed until a budget is finalized.
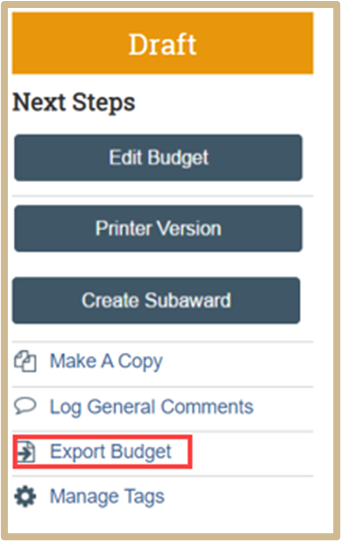
From the Individual budget Workspace Select Export Budget from the Activity List.
As this action is being prepared, a new screen will appear. After the budget export is prepared, this screen will disappear.
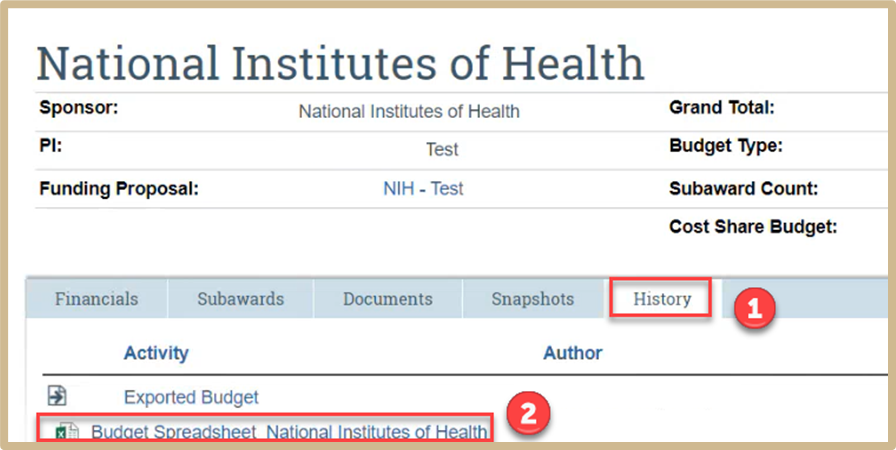
Click History, followed by Exported Budget Spreadsheet.
The Excel file will download. Proceed to downloads on the computer to open the document and save to the proposal folder.
Open the document.
Follow the Budget Template instructions located here Create a Budget Template.
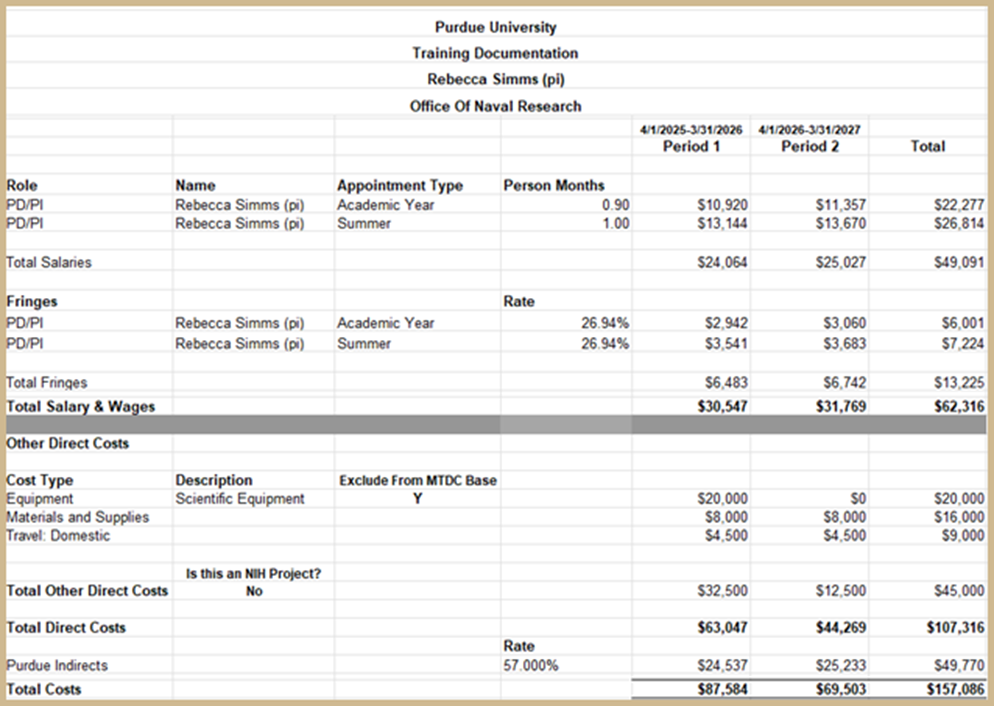
The Budget Template will be sent to the sponsor for further adjustments until finalized.
![]() NOTE
NOTE
The FINAL Budget Template must be uploaded to the Funding Proposal “Add Attachments” activity prior to proposal submission. This file is mandatory for all proposals. Post-award and Finance will use this file at award time.
The excel file will be emailed to the PI via Outlook and used to edit the budget until it is final. After a budget has been reviewed and approved, change the name of the budget to include “FINAL” as the first word. All final budgets must have “Yes” selected in the “Include in Consolidated Budgets” question on the General Information page of the Budget. When marked Yes, all associated Cost Share and Subaward Budgets will be included.
2.

![]() Select Yes to include this budget in the total proposal budget displayed in the financials tab of the proposal workspace. The financials tab should reflect the total sponsor budget submitted in the proposal.
Select Yes to include this budget in the total proposal budget displayed in the financials tab of the proposal workspace. The financials tab should reflect the total sponsor budget submitted in the proposal.
Select No to exclude this budget from the total proposal budget. If this is a cost share budget, always select No.
Select Continue to proceed.
Content Updated:

